🤖 AI Summary: Facing a cascade of crises including a rental scam, a car accident, medical emergencies, and income clawbacks, a couple is struggling to survive and afford basic food. They are urgently seeking community help to raise funds to save their storage unit from being locked and losing irreplaceable family keepsakes.
First off, we want to say how hard it is for us to ask for help. This is a long post, and we really appreciate you taking the time to read it. When people ask if we’re okay, the honest answer is no. Also, before I get into everything: if anyone tells me to get rid of Harley, please remove yourself from my life. He’s one of the only reasons I’ve stuck around, and getting him just happens to be where Murphy’s Law kicked in.
Sorry if this is all over the place in advance…
Shortly after we rescued Harley from being taken out to a back field with a .22, our landlord gave us notice to either get rid of him or move. We chose to move, but ended up losing $3,500—our entire savings—to an awful rental scam. We stayed with a friend for a while, put our things into a storage unit, and finally managed to find a place to rent a couple of months later. Then, not even a month into the new place, Harley sliced his foot open on a buried can lid in our yard under the snow. Of course it happened after business hours, so off to the emergency vet we went.
We had to take out a loan that night just to pay for his care. Just when it felt like we might finally catch our breath, we got hit again. We lost our phone and internet service, which caused me to lose my spot on a specialist waitlist I’d been waiting for over six years now. Around the same time, my partner lost his family doctor right after being confirmed with fibromyalgia and osteoarthritis, just as we were trying to get his disability paperwork together.
We were pushing ourselves to the absolute limit doing Instacart—clocking around 36,000 steps on an average day and living off Costco hot dogs from the concession stand—until a car accident left us without a vehicle. After that, we were walking even more just to survive, gathering bottles for cash and eating a slice or two of bread for the entire day. We were left with no real way to make an income. I can’t take public transit for things like freelance work without having severe panic attacks from PTSD, which piles onto my depression, social anxiety, and physical mobility issues from past accidents, which limits the gigs available.
On top of all that, we’ve been hit with clawbacks on our only source of income, my AISH (now ADAP). There are two of us living off of it. They’re taking $200 a month while I wait on forms to be completed for the DTC, and another $100 was deducted because a federal food rebate cheque was counted as “income”—even though I didn’t even get to see it. During all of this, our deep freeze died, and we lost $150 worth of frozen food. Then, with the first rollout of ADAP, my payment was shorted by another $100. I spent an entire day on hold trying to report the shortage, only to be hung up on after business hours. Right now, after our automatic bill withdrawals, we are sitting around $400 in the negative.
Earlier this year, to top things off, both of Kit’s grandparents passed away. I was waiting and hoping I might be able to breathe once our tax return or a small inheritance came in, but neither has arrived yet.
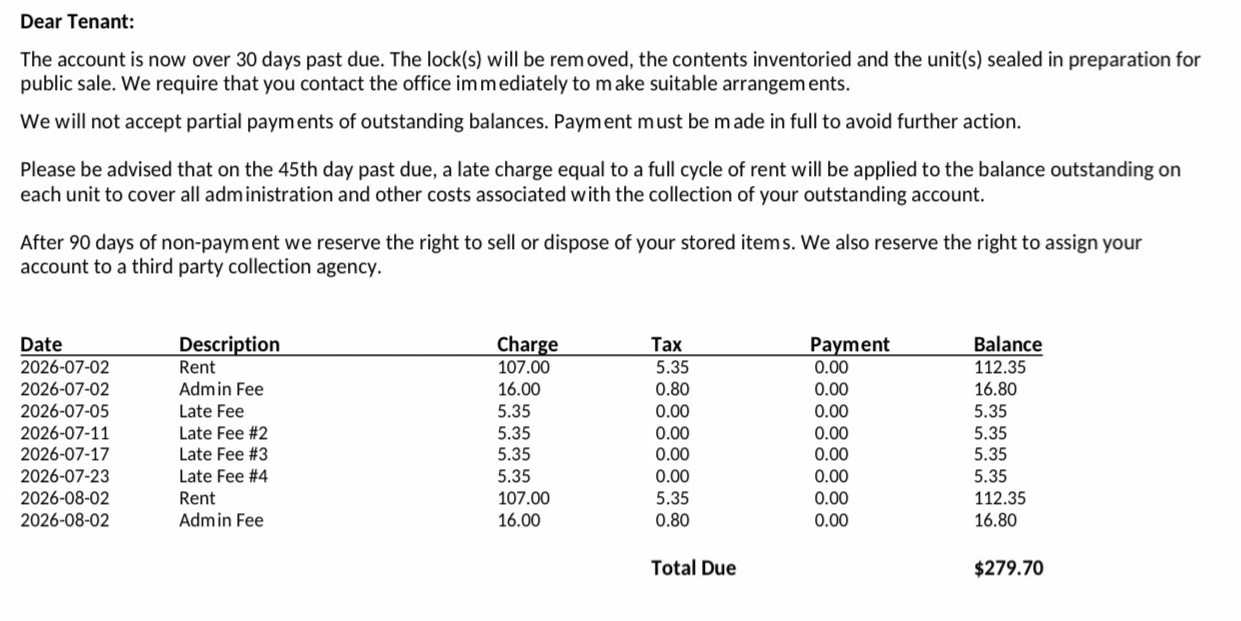
Over the past three months, I haven’t been able to pay for our untouched storage unit. It doesn’t just hold our family keepsakes—it also has irreplaceable belongings from my late sister, who passed away from brain cancer for a second time. I’ve been trying so hard to pay it off and close it out so we can use that money for food, but I was just given a Notice of Lock Cut.
Because the facility won’t accept partial payments, I’m asking for help to raise the $279.70 needed to pay off the unit in one go. Hopefully, at least $50 more to help pay for people to move our stuff out and drive us across town in the process. The account is over 30 days past due, meaning they are preparing to cut the locks immediately. If the balance isn’t cleared before August 16th, the late fees will double. I need to secure this so we don’t lose my sister’s memory and our family keepsakes, and so we can finally afford to eat. Currently, outside of a bit of food from the food bank and family, we only eat every 2 to 3 days. Personally, I am down to under 100 lbs.
I know money is tight for everyone right now, and so much is hitting the fan for so many people. But if anyone could please, please help, every little bit would be ever so appreciated. I’m trying so hard to get up each day… but honestly it’s getting hard. Between everything else and the panic attacks I get now just looking at my mail—wondering if I’m going to be cut back even more—I feel like I can’t breathe.
If you’re able to help financially, the Stripe link below is 100% private and secure. I am just trying to stay alive right now, and my brain is screaming to shut down and retreat back into myself. Even if you can’t donate, sharing this post is helpful too. I’d like to stop looking like skin and bones… and be able to afford some food.
Or you can click here to visit Stripe directly. Anything above will go to additional food and properly paying people to help move everything.
🤖 AI Summary: Who You and anyone else you want! Even your pets, if you would like! What Where Kiki’s Twitch! When Stream starts at 2:30 PM! (2:30 PM MDT) Subject to change due to a Sir Flop.
Who
You and anyone else you want! Even your pets, if you would like!
🤖 AI Summary: With Anet bringing back a reason for players to use up their excess Karma currency, this guide will help new, returning, and veteran players stack that Karma. We will go over some quick ways to gain karma and items that can be used to boost karma gathering. The Basics: Level 1 to Fresh 80 Fundamentals […]
With Anet bringing back a reason for players to use up their excess Karma currency, this guide will help new, returning, and veteran players stack that Karma. We will go over some quick ways to gain karma and items that can be used to boost karma gathering.
The Basics: Level 1 to Fresh 80 Fundamentals
If you just installed Guild Wars 2 and are staring at a growing pile of purple triangles in your wallet, welcome to Tyria! Before you start worrying about maximizing buffs, buying gobblers, or running meta trains, here is exactly what you need to know about Karma as a new player.
How you can earn it naturally
You get Karma just by playing the game! Completing Renown Hearts (the golden hearts on your map), which give 90 to 675 Karma based on the level of the Renown Heart itself. Participating in orange Dynamic Events, which scale from 20 to 378 Karma depending on your level and participation tier (Bronze, Silver, Gold), and doing your Personal Story quests will passively fill your wallet as you level. Adding a Karma buff, like from food, for example, helps with later game content if you add one early on.
What you should spend it on early (Level 1–79)
While levelling, do not buy gear on the Trading Post with Gold. Instead, whenever you finish a Renown Heart, that NPC turns into a Karma Merchant. Talk to them and use your Karma to buy level-appropriate weapons and armour to keep your stats topped up for pennies.
The “Fresh 80” Milestone
The moment you hit Level 80, your first major goal is to get a full set of Exotic-tierarmor. Instead of spending your Gold, head to the Ruins of Orr. The Temple Karma Merchants (like the Temple of Balthazar or Temple of Grenth) sell level 80 Exotic armour pieces for 42,000 Karma each. A full set costs 252,000 Karma—a massive gold saver that immediately makes your character ready for Fractals, expansions, and endgame maps.
The Golden Rule
Outside of buying levelling gear and your first set of level 80 Temple armour, hoard the rest of your Karma. Do not worry about the hardcore buffs or account upgrades listed below until you are actively running endgame meta trains, grinding, etc!
Newest Karma Boosting Enhancement Items
The Snow Diamond Ornament is currently one of the best for utility buffs. You can craft it after purchasing a recipe from the Wintersday Vendor in Hooligans Route or grab it straight off the Trading Post. It’s a utility enhancement that lasts for 30 minutes and offers a massive +20% Karma bonus. Remember: Only one utility item enhancement can be active at a time. You can, however, stack it with your standard Food buff for even higher buffs!
What it does: These are permanent account upgrades that force applicable enemies to drop karma consumables (and/or add karma to final chests) on specific Living World maps. If you are farming these zones, you need these unlocked.
Only three of the six Living World Season 3 maps offer Karmic Retribution (Bloodstone Fen, Lake Doric, and Draconis Mons do not). For the maps that do, your upgrade tier dictates the size of the liquid karma dropped.
Tier 1: 1,000 Unbound Magic & 5 Gold → Chance to drop Drop of Liquid Karma (600 Karma)
Tier 2: 5,000 Unbound Magic & 10 Gold → Adds chance to drop Thimble of Liquid Karma (1,000 Karma)
Tier 3: 10,000 Unbound Magic & 15 Gold → Adds chance to drop Sip of Liquid Karma (1,500 Karma)
Notes: Upgrades are account-bound, limit one of each tier per map, and consumables only drop from enemies that yield loot. Upgrading to a higher tier also increases the drop rates of the lower-tier items.
Just like Season 3, select LWS4 maps let you unlock 3 levels of Karmic Retribution. The difference here is that if you have Tier 3 unlocked on any of these maps, enemies have a chance to drop Basic, Fine, or Masterwork consumables.
Bjora Marches in The Icebrood Saga uses a slightly different buff called Karmic Empowerment, which stacks up to three times and permanently increases karma from events. Meanwhile, Drizzlewood Coast remains one of the most profitable meta-events in the entire game, so upgrading your Retribution at the Base Camp is a no-brainer.
Permanent 3% to 10% Karma gain bonus based on your guild’s unlock level
Totally free! Claim it from Nathan the Bartender in your Guild Hall. Remains active permanently until you swap it for a different enhancement.
Enrichments & Enhancements
Don’t run around Tyria without an Enrichment slotted into your Ascended Amulet (you can always safely take it out later with an Infusion Extraction Device if you change your mind). Pair this with an Enhancement—a consumable utility item that runs alongside your Food (Nourishment) buff. You can only have one Enhancement active at a time.
A prestige cosmetic variant. Selected from the Dedicated Anniversary Achievement Box (Year 8). Adds a festive fireworks and purple glow aura. Duplicates of this item cost 25 Laurels and 5 Gold.
Selected from the Wurm’s Enrichment Choice Chest, earned from Frode’s Journal achievement. Adds a ghostly swimming wurm companion. Duplicates of this item cost 1 Laurel and 20 Gold.
Utility Station: creates an interactive fire that lasts for 15 minutes in the open world, allowing players to grab a 60-minute buff. This buff is unique and stacks with standard Food and Enhancements! Usage provides the identical effect as the Karma Booster, Experience Booster (fine), or Magic Find Booster. This means you can not stack the campfire and boosters together.
Equipped on to your Gathering Tools. Note: The Karma granted by this glyph is a flat rate and is NOT affected by any of your Karma booster percentages.
Festival Gobblers are the secret weapon for veteran farmers. You feed them cheap seasonal currency in exchange for short-duration boosts, and you can spam them to stack the timer for hours.
Can grant a random buff — most notably the +50% Karma buff (identical to the Gem Store Karma Booster). Also grants Exp, Magic Find, or Movement Speed boosts.
Consumes 3 Pieces of Candy Corn per use. The outcome is random, but you can spam the gobbler repeatedly to stack the durations up to a maximum of 7 days!
Grants the Festival Gobbler Boost (+25% Experience from Kills, +25% Gold from Kills, +25% Reward Track Gain in PvP/WvW).
Consumes 5 Snowflakes per use to grant a 15-minute buff (can be spammed to stack duration). Crucial Note: This does not grant a Karma buff! However, it is listed here because veteran farmers will run this simultaneously alongside the Candy Corn Gobbler to maximize all possible meta train yields.
Grants the same Festival Gobbler Boost as the Snowflake Gobbler.
Consumes 25 Pieces of Zhaitaffy per use for a 15-minute buff (can be spammed to stack duration). Useful if Zhaitaffy is cheaper on the Trading Post than Snowflakes.
Account-Wide & Permanent Buffs
Veterans of the game have access to invisible, permanent buffs, while Fractal runners can purchase permanent drop enhancements similar to the Living World maps.
Permanent, passive bonus scaling up to a maximum cap of 50% Karma gain.
As you reach AP milestones and open achievement chests, your account gains permanent, passive percentage boosts to Karma, Gold, and EXP. The hard cap is exactly 50% (achieved at 50,000 AP).
Given out during the annual Extra Life charity event. Functions identically to a standard Karma Booster.
Standard Nourishments
Many nourishments grant karma buffs; however, listed below are some of the more commonly used ones in the meta. Most are purchasable on the Trading Post, and those that must be crafted require the highest cooking level, Grandmaster Chef.
Note: Unless otherwise stated in the table, the items below provide a standard 30-minute Nourishment buff. While not every popular meta-farming food provides a native Karma boost (like the Peppermint Omnomberry Bar), they are included here so you can weigh your overall farming priorities.
+30% Magic Find +40% Gold from Monsters +10% Experience from Kills
The undisputed standard go-to for veteran gold farmers. (0% Karma natively)
Modern Guild Banners & Map Buffs
The old Guild Karma & Experience Banner has been retired. If you are looking for banners at meta events or pushing specific maps, look for these modern buffs.
Can appear when you volunteer to move to a more populated map instance.
Stacking & Practical Tips
Many karma bonuses stack additively (Banners, Consumables, Guild Boost, Gobbler Boosts, Karmic Retribution, etc.)—but some same-source effects (like two different guild banners) won’t stack.
Buy Karmic Retribution stacks one at a time to avoid multi-buy bugs that have been seen historically with some vendors.
Use Candy Corn / Snowflake Gobblers, Guild Banners, and Extra Life stacks together during high-density routes for the absolute largest per-hour karma returns.
Always verify vendor prices and buff durations in-game; event patching and seasonal changes sometimes adjust costs/durations.
During Wintersday, always complete the Donation Drive first for Winter’s Blessing, and watch for Volunteer’s Blessing if the route offers a map swap.
Note: You need the Grandmaster Chef mark to craft these, but anyone can eat them. Feasts are astaple in group content because one drop buffs the entire squad. If you’re leading a meta train, drop one of these.
Universal Ascended Feast Buffs: Once placed, a feast remains for 5 minutes. Consuming it provides a 1-hour Nourishment buff that includes the following base stats: +10% Karma, +5% All Experience Gained, +20% Magic Find, +20% Gold Find, and +10% WXP Gained.
66% Chance to Steal Life on Critical Hit. Used when players want a broad, flexible stat bump.
Crucial Warning: The “Liquid Karma” Trap
If you’re a returning player from the vanilla days, you probably remember stacking every buff in the game before consuming massive stacks of Jugs of Liquid Karma to multiply their value. Stop right there!
ArenaNet patched that exploit out years ago. Today, Karma boosts DO NOT affect consumable Karma items in your inventory. A Jug will always give exactly 4,500 Karma, and a Drop will always give exactly 600 Karma, regardless of how many banners or gobblers you have active. Pop your consumables whenever you want, but save your heavy buffs for live events and enemy kills!
The Ultimate Karma Farming Routes & Activities
Alright, your character is fully stacked with Karma-boosting food, gobblers, banners, enrichments, etc. Time to actually play the game, and by that I mean farming. Earning Karma efficiently boils down to three things: high base event drops, massive rewards, and mob tagging.
1. The Seasonal GOAT: Wintersday Orphans
The Wintersday Orphan Route is widely considered one of the most efficient Karma farms in the game. Available only during the Wintersday festival (mid-December to early January), this daily activity is mandatory for Karma farmers.
The Method: Purchase or craft 30 Wrapped Gifts. Run a specific route through Divinity’s Reach to give one gift to each of the 30 orphans.
The Yield: With maximum Karma modifiers stacked (boosters, food, gobblers, banners), this nets over 100,000 Karma in about 5 to 10 minutes.
Pro Tip: Use the Blish HUD Pathing module with a community marker pack to see a 3D line guiding you directly to every single orphan.
2. Daily Instanced Content (Fractals, Raids)
If you prefer structured PvE combat, daily instances provide some of the largest raw, instant Karma drops in the game.
Weekly lockouts apply. First kill of each boss per week yields a massive Karma bouncy chest.
3. Open World Meta Trains
For players who just want to turn their brain off, tag up, and follow a Commander, Open World Meta Trains are the bread and butter of GW2 farming. To maximize your Karma here, run a build capable of tagging a dozen enemies a second (like a Shortbow Thief, Staff Mirage, or Scourge).
Awards up to 15,000+ Karma unbuffed. You get Karma for the main kill, plus extra Karma consumables for every Megalaser battery successfully defended during the phases.
With the implementation of the Wizard’s Vault, players now have a direct, reliable way to purchase Karma without having to grind events.
How it works: By completing Daily and Weekly Wizard’s Vault objectives, you earn Astral Acclaim.
The Reward: You can spend Astral Acclaim in the Vault store to purchase a Bag of Karma. Each bag grants a flat 10,000 Karma.
Crucial Tip: Always buy the limited batch of Karma bags first, as they are incredibly cheap. Avoid buying the “infinite” batch of Karma bags once the limited stock runs out—it is a massive waste of Astral Acclaim compared to buying Gold bags instead!
Crucial Mechanic: Diminishing Returns (DR)
If you’re grinding open-world events, you need to watch out for Diminishing Returns (DR). This is an invisible anti-botting mechanic in Guild Wars 2. If you camp thesame zone and farm the same events for too long, the game aggressively throttles your Karma and loot yields until they hit zero.
How to avoid DR: Never farm a single, isolated event for hours. Participate in wide-ranging Meta Trains that move across the map, or switch characters/maps every hour or two to reset the hidden tracker.
Get out there, drop your banners, and start liquidating that Karma. See you in Tyria!
🤖 AI Summary: The are no backward-incompatible changes! Here’s the normal changelog as well as the full changelog Send me a message if you need any help, or join the Home Assistant Community if you are not already a part of it! If you missed the patch notes for the major release this month, you can read them […]
@puddly made it so that we avoid firing discovery events when flows immediately create a config entry in #155753 and added firmware flashing debug loggers to hardware integrations in #156480
@xE1H removed the arbitrary forecast limit for meteo_lt in #155877
@emontnemery fixed the progress step bugs in #155923, corrected migration to recorder schema 51 in #156267, as well as the checking of collation of statistics_meta DB table in #156327
@TimoPtr made sure to clean register callbacks when mobile_app reloads in #156028
🤖 AI Summary: In this release, there are a whole bunch of bug fixes as well as a few improvements, Android 5.0 & 5.1 Support and Configurable Gestures There are quite a few additions and a whole bunch of bug fixes in this release! @dshokouhi set the default server AA favourites in #5750 @silamon made their first contribution with a […]
In this release, there are a whole bunch of bug fixes as well as a few improvements, Android 5.0 & 5.1 Support and Configurable Gestures
There are quite a few additions and a whole bunch of bug fixes in this release!
@TimoPtr did a lot of updating with the onboarding setup process, as well as the server selection and a few other things this release!
Add onboarding navigation scaffold and Welcome Screen updated in #5705
🤖 AI Summary: Well, there’s not much this time around other than a few changes and some bug fixes. The notable changes are: Remember to at least glance through the breaking changes in case one of your automations or scripts relies on one of them. Send me a message or comment here if you need any help! View […]
Well, there’s not much this time around other than a few changes and some bug fixes.
The notable changes are:
KNX Climate humidity DPT, thanks to @farmio – Change on GitHub: #155942
Fix for corrupt restored state in Miele consumption sensors, thanks to @astrandb – #155966
The breaking changes remain the same as in 2025.11.0:Set the assumed state to group if at least one child has an assumed state
Previously, the group’s assumed state was always false, regardless of the state of its child entities.
This has now changed:
The group will now have an assumed state of true if at least one child entity has an assumed state. This makes the group’s assumed state reflect the uncertainty of its children more accurately. These domains have been added: switch, fan, light, and cover.
The mealie Integration now requires Mealie version 2 or later.
Mealie version 1 is no longer supported. Version 2 was released in October 2024, so over a year ago. Given the differences between versions 1 and 2, we are no longer able to support or test backward compatibility with version 1.
The tilt position of motion_blinds devices have been corrected to align with the Home Assistant standards. The new tilt position will be: 0 = closed/covering the window opening, 100 = open/letting light through.
The previous tilt position can be converted to the new tilt position as follows:
new = 100 - old
current_tilt_position = 100 -> 0
current_tilt_position = 75 -> 25
current_tilt_position = 50 -> 50
current_tilt_position = 25 -> 75
current_tilt_position = 0 -> 100
open_cover_tilt -> close_cover_tilt
close_cover_tilt -> open_cover_tilt
Any automations concerning Motion Blinds devices that use the current_tilt_position attribute or use tilt open/close will need to be adjusted.
The mobile_app integration, which supports the iPhone and Android companion apps, now handles zone-only updates better. When your companion app sends just the zone name (not the exact coordinates), the device tracker will show the zone’s friendly name.
The person entity now shows the zone’s friendly name (not its object ID) for custom zones. This might break existing automations that trigger on a person’s state.
As an example, if you have a zone named zone.kids_school with the friendly name School:
Before this change, the state of the corresponding person and device_tracker entities would be kids_school when the “Location Sent” in the companion app was set to send “Zone Name Only” and School when it was set to “Exact”.
After this change, the state of the corresponding person and device_tracker entities will be School for both the “Location Sent” settings in the companion app.
The discovery of Renault functionality was previously based on assumptions that may have created invalid and non-functional entities. These will no longer be created.
The Traccar integration has been updated to use a more secure API Token for authentication. This is a required, one-time breaking change to align with Traccar’s security recommendations and ensure the integration continues to work.
This release migrates the integration away from the older username/password method, ensuring continued stability and security for all users while also allowing users with SSO-based setups to use the integration.
When you update Home Assistant, the existing Traccar integration will need to be re-authenticated:
Generate an API Token on your Traccar server (you’ll find this option in your Traccar server’s user settings).
Go to Settings > Devices & Services > Traccar Server.
Click “Reconfigure” and enter your new API Token when prompted.
Once you’ve done this, your Traccar devices and entities will work exactly as they did before.
The Account tier and Gold tenure sensors have been retired, as they no longer receive updates following the transition from Xbox Live Gold to Xbox Game Pass. Additionally, the In party and In multiplayer binary sensors have been removed, since they’ve been non-functional for quite some time.
🤖 AI Summary: Since Home Assistant now requires you to swap from Supervised to Docker or OS i figured i’d make a quick tutorial on creating a quick Docker tutorial on reinstalling it. Backing Up/Downloading Encryption Key First, we go to your Settings Then Backups Before you continue, make sure you have a new backup and download it […]
Since Home Assistant now requires you to swap from Supervised to Docker or OS i figured i’d make a quick tutorial on creating a quick Docker tutorial on reinstalling it.
Backing Up/Downloading Encryption Key
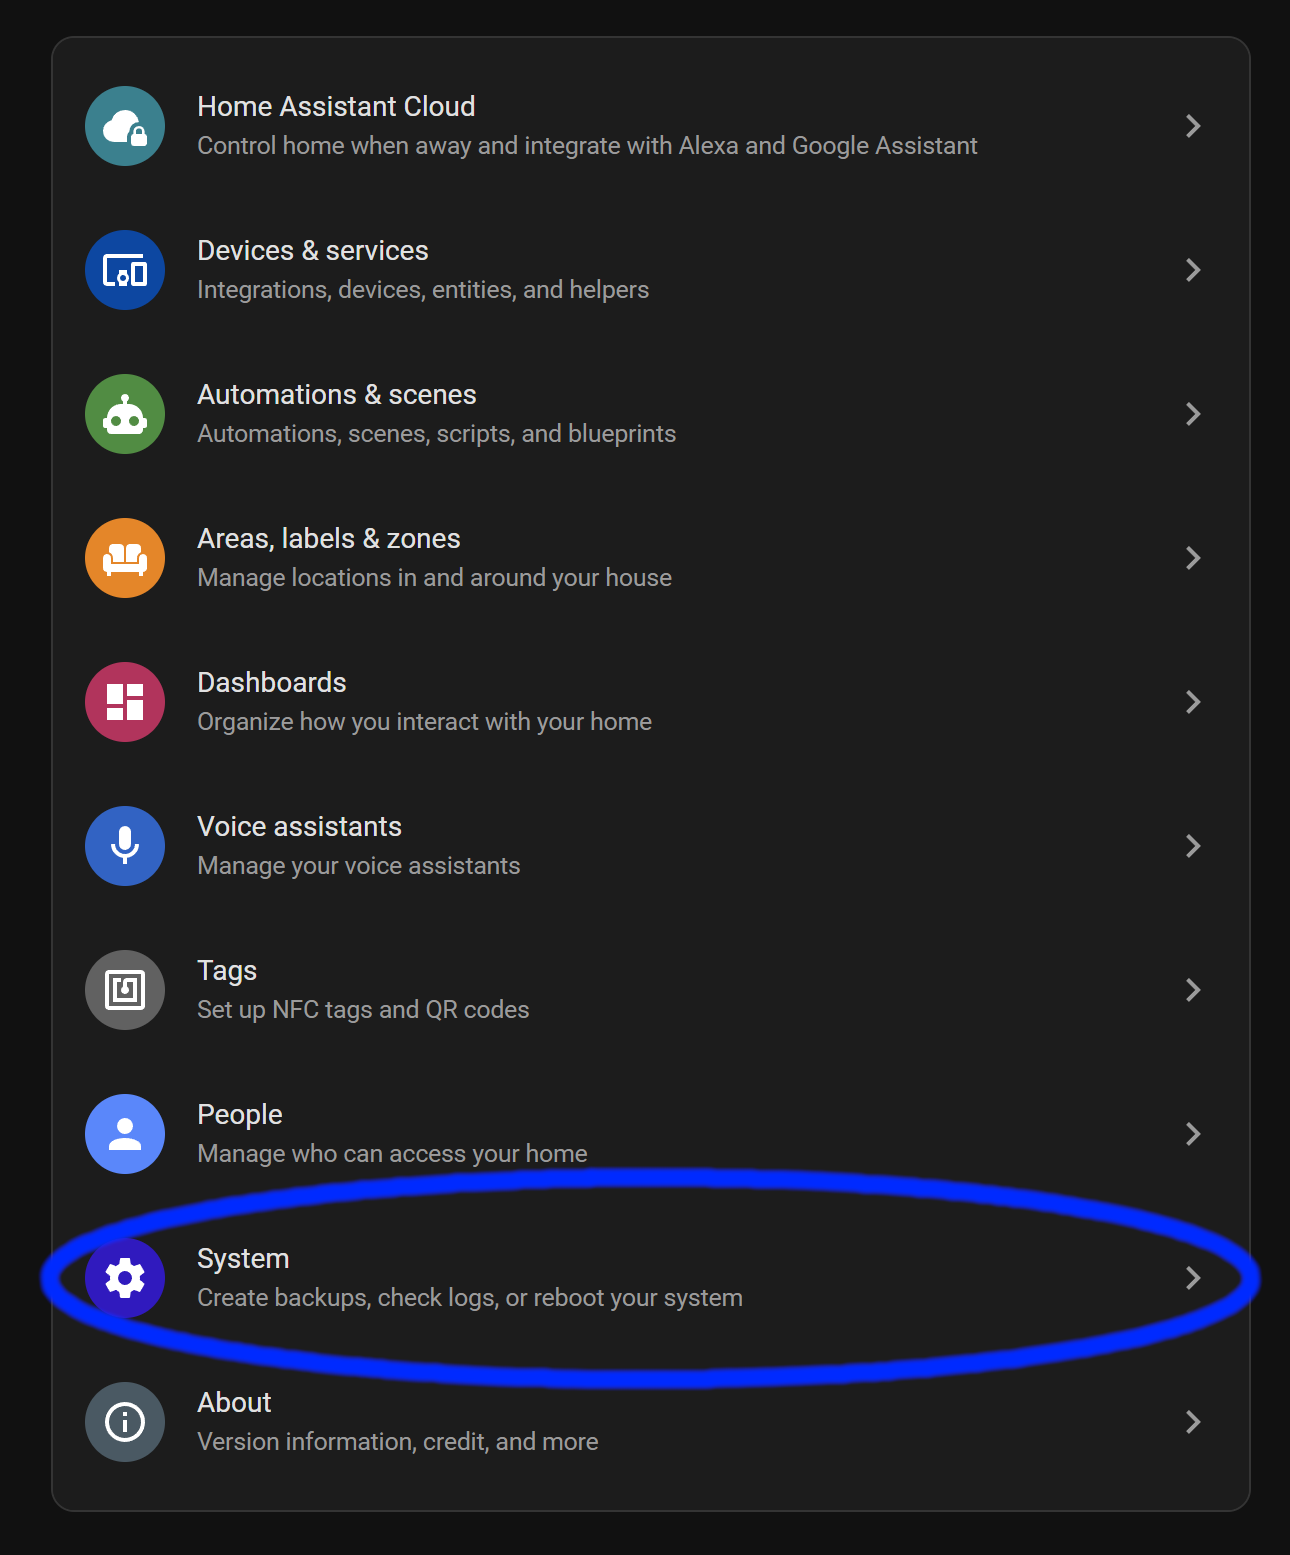
First, we go to your Settings
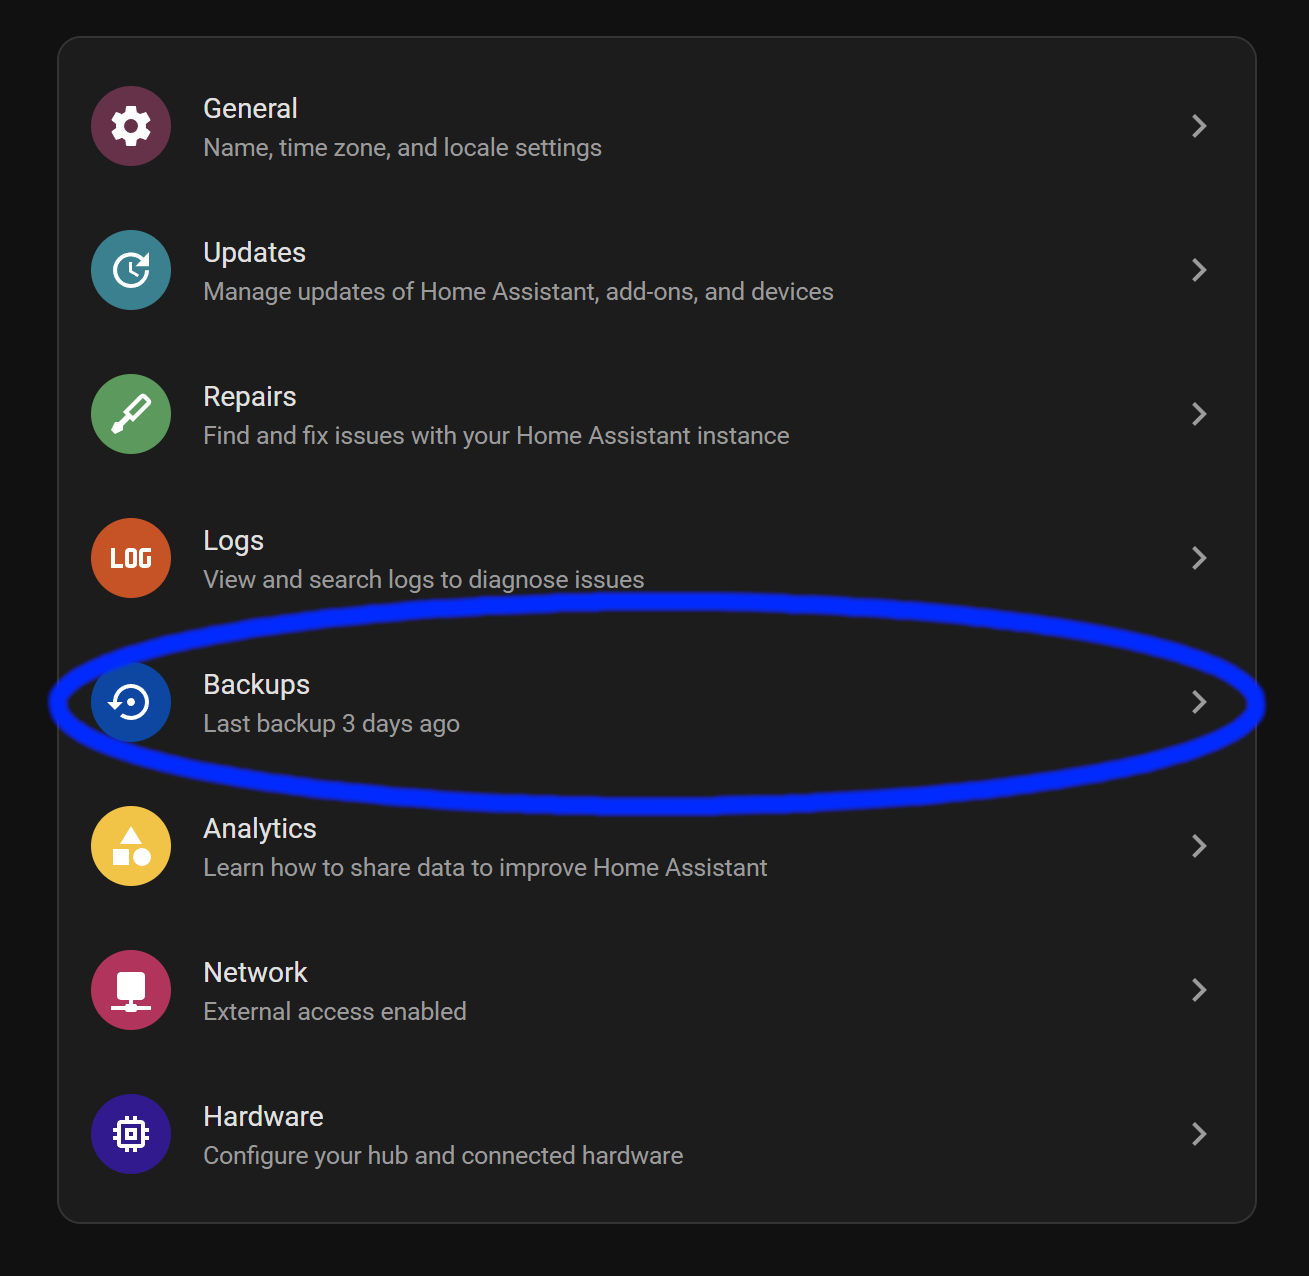
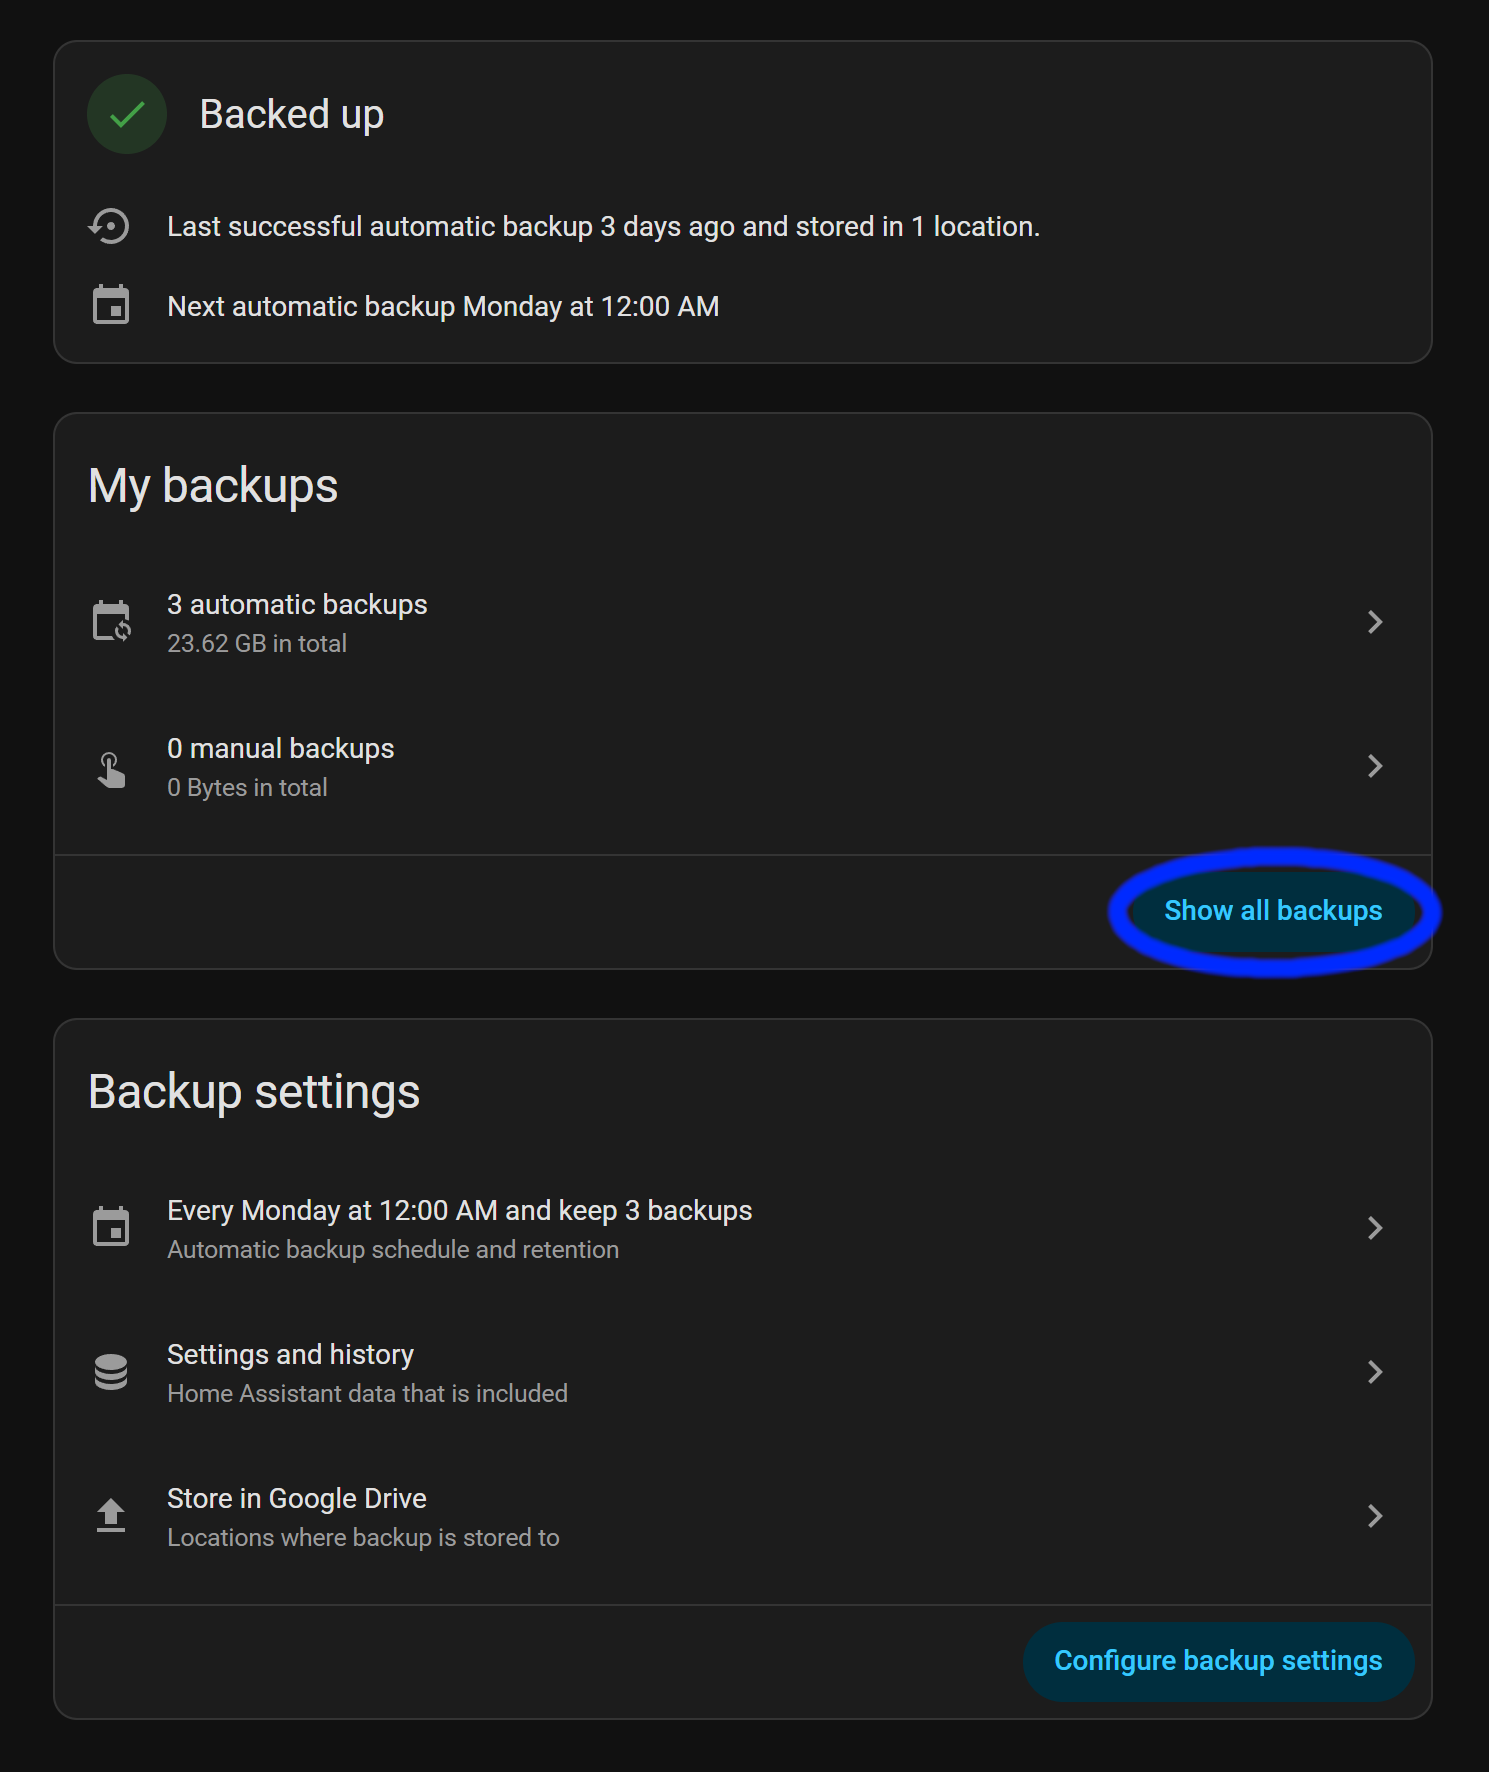
Then Backups
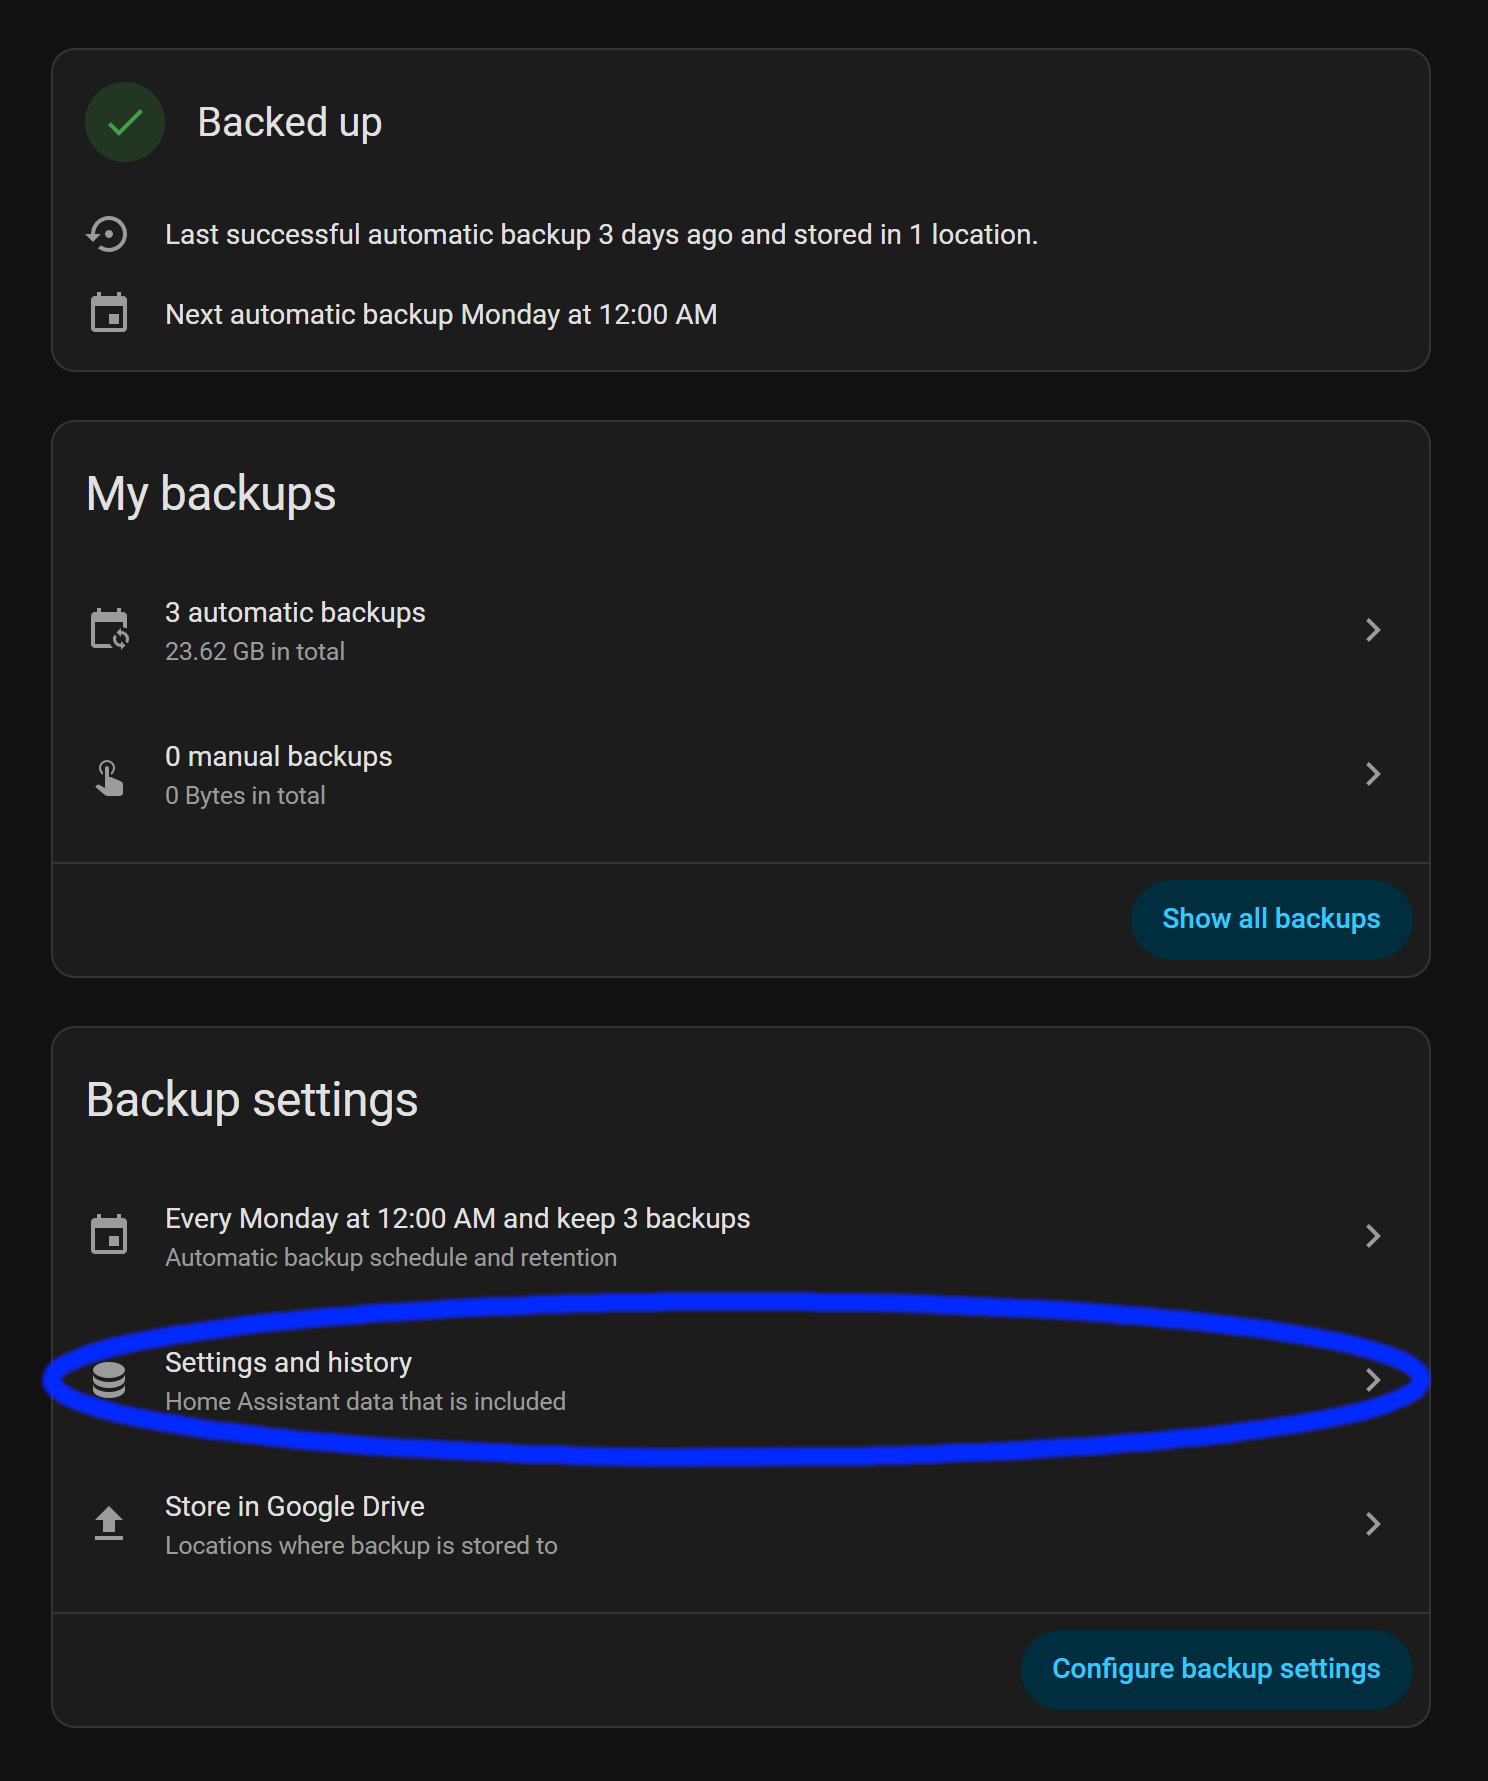
Before you continue, make sure you have a new backup and download it to your computer so we can upload it later. If you’re using Home Assistant Cloud, you just have to make a new backup and upload it to the cloud if you want to restore from the cloud.
Click Settings and History
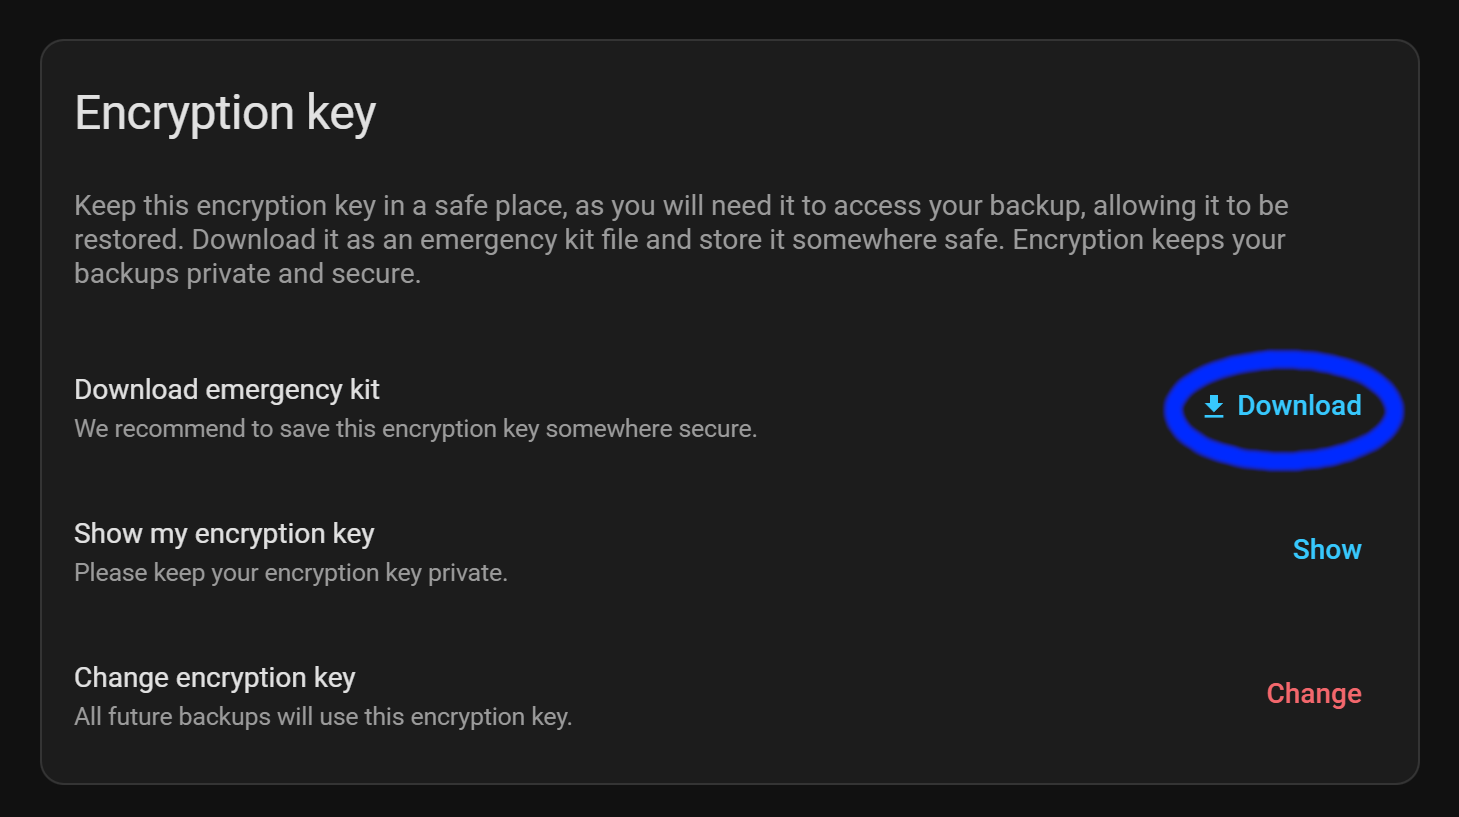
Download your Emergency Kit txt file
We have to make sure you have your emergency kit downloaded so we can use your encryption key when you restore from your backup.
After the Emergency Kit is downloaded, go back.
Click Show Backups
Now we go and download your latest backup.
Click the three vertical dots
Click on download.
This will take a while if your backup is large.
After that’s all done, we can continue on!
While that is downloading, we should either create your compose file or set up Portainer.
Here is the basic Compose file for getting Home Assistant running in Docker.
*Note* The official docs for installing Home Assistant in a Docker Container includes container_name: homeassistant above the line image: "ghcr.io/home-assistant/home-assistant:stable". Avoid container_name unless you have a specific need (legacy scripts, monitoring tools expecting a fixed name). Rely on the service name and Compose defaults for cleaner, more portable setups.
Here is where we have to change /PATH_TO_YOUR_CONFIG to where you want to store your Home Assistant configuration files.
    volumes:
      - /PATH_TO_YOUR_CONFIG:/config
YAML
We have to create a folder like /home/hassio/home_assistant/ha_config, in my case, hassio is the username of this account. I created a folder home_assistant and then ha_config.
I created two folders nearly named the same because I want to run some addons as well, so I put the config folder for each addon in home_assistant, then my Home Assistant configuration folder is ha_config.
All you need to do is SSH into your device with something like Putty or CMD/Terminal. Log in as the user you want to manage the Home Assistant Docker setup with. In my case, it’s hassio. Then, create the folder or folders, as I did for my setup, or create a folder in your user’s home directory and call it good. It’s up to you what you want to do.
Create a folder with:
mkdirha_config
Bash
Replacing ha_config with what you want to use, if you use a different name.
Understanding the Configuration
    volumes:
      - /etc/localtime:/etc/localtime:ro
YAML
This line allows Home Assistant to read the time on your computer. Assuming it’s been set up already.
    volumes:
      - /run/dbus:/run/dbus:ro
YAML
This allows Home Assistant to communicate with the host’s system bus — e.g., to talk to system services (BlueZ Bluetooth, systemd, Avahi, some hardware/service discovery daemons) that expose APIs over D-Bus. Home Assistant uses this to access some integrations that expect a system D-Bus to be available on the host.
restart: unless-stopped tells Docker to restart the container automatically if it exits (crashes, is killed, or the daemon restarts).
privileged: true grants the container nearly every capability the host kernel gives processes — roughly equivalent to giving the container full root-like access to the host.
network_mode: host makes the container share the host’s network stack. Practically: the container has the host’s IP addresses and network interfaces. It does not get its own isolated network namespace. In this mode, you do not need ports: mappings — the container listens on the host interfaces directly, localhost inside the container == localhost on the host, service discovery via Docker networks (service-name DNS) does not apply for other containers — host networking bypasses those DNS aliases.
Make sure you save the file, then we can continue!
Setting up the Container in Portainer
First,we have to navigate to the Portainer host. If you need help with setting up, check out this post!
Next, we have to start creating a new container.
We are going to be using the following details to input into Portainer.
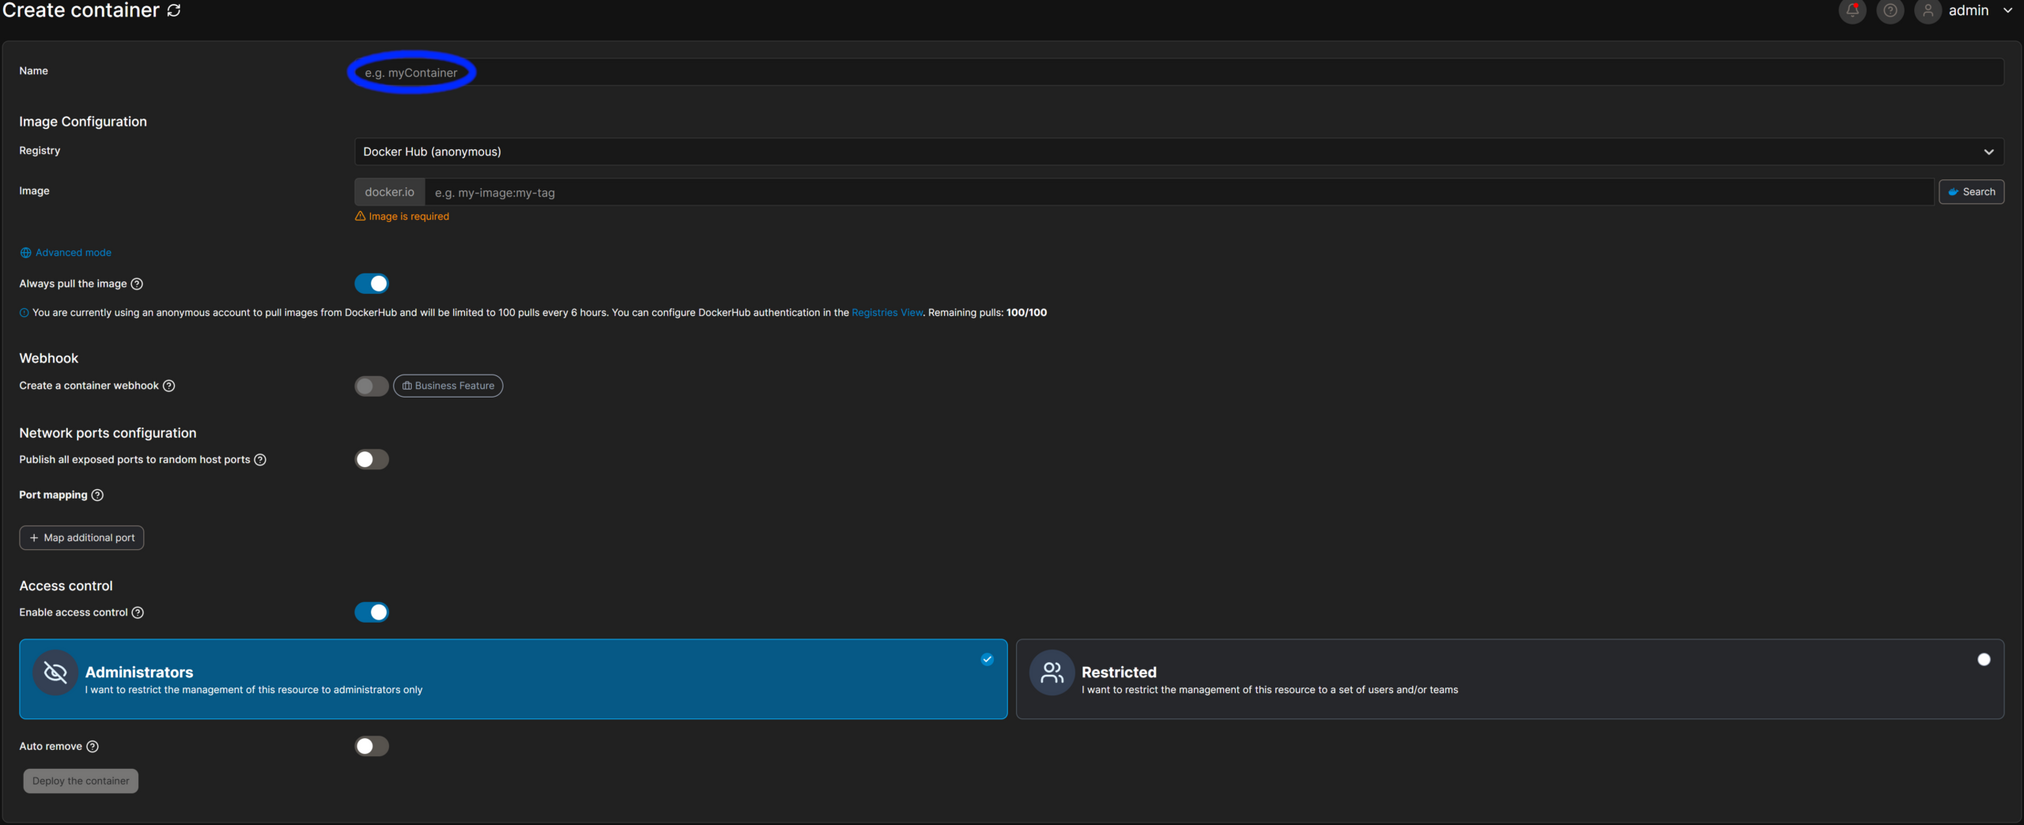
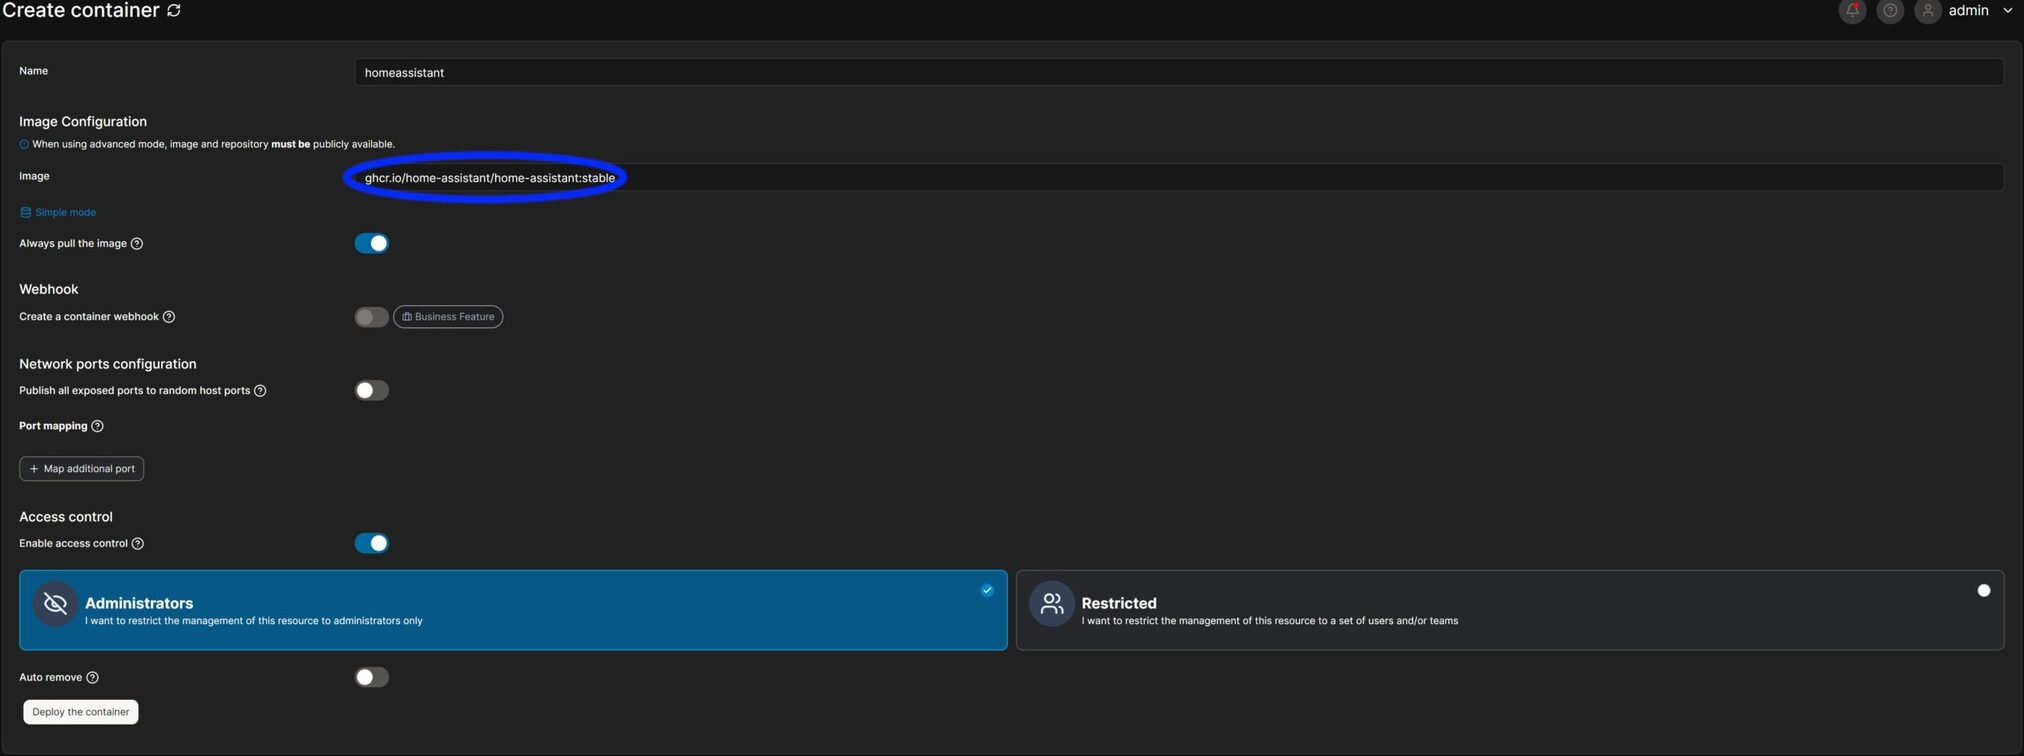
First, we navigate to the containers section and click on Create Container
Then select New Container on the top right
You should get a page like this, where we can put the name of the container from line #2 from above.
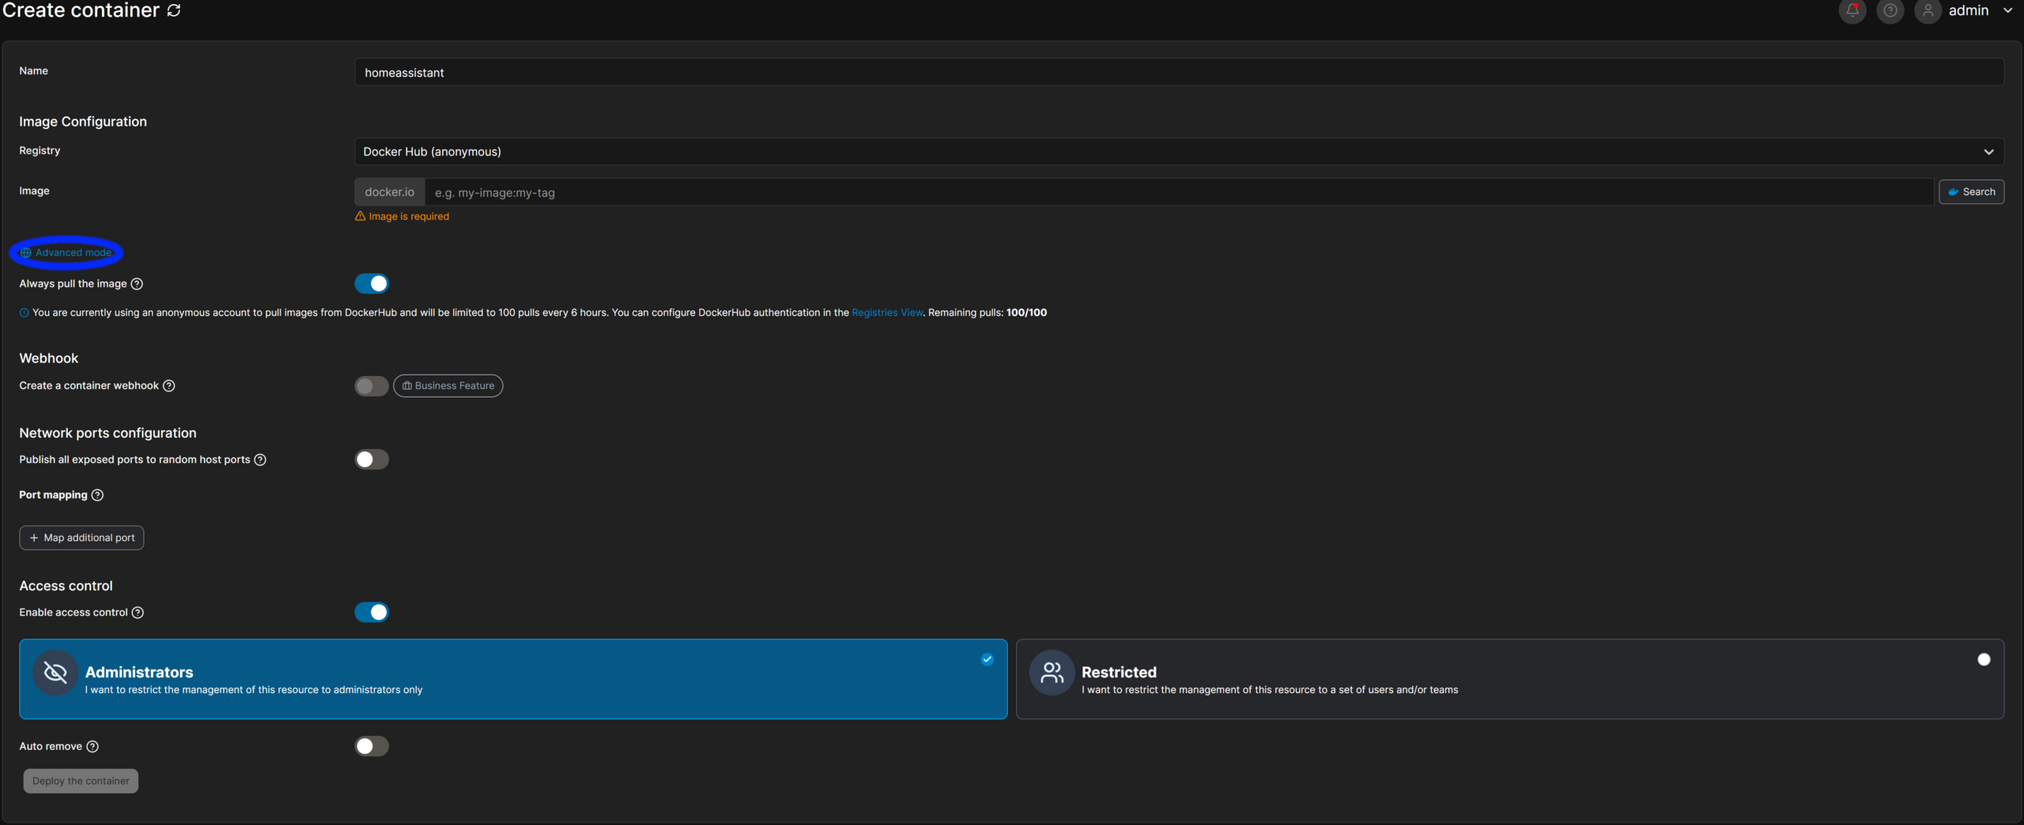
Now we click on Advanced
Paste the URL from the image section, copying between the quotes
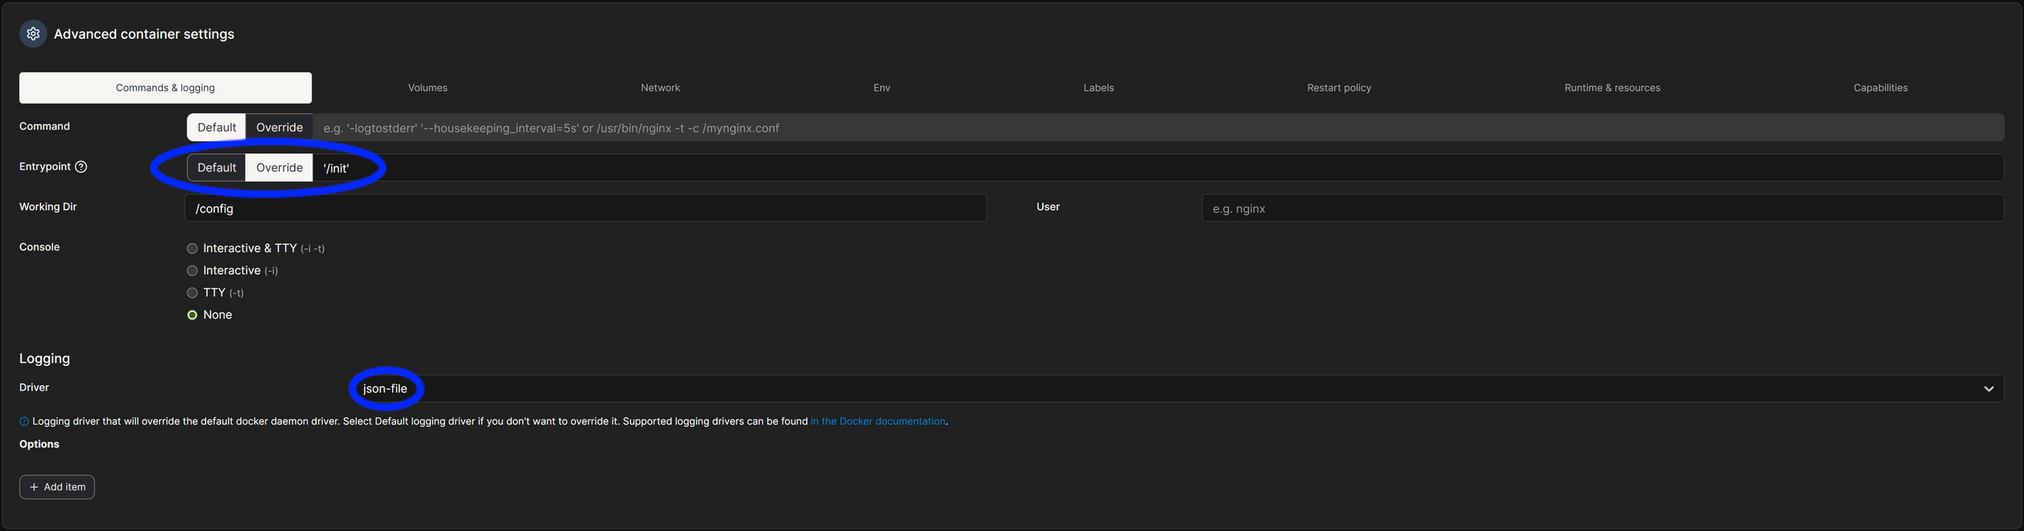
Set the Entrypoint to '/init' and the Logging Driver to json-file
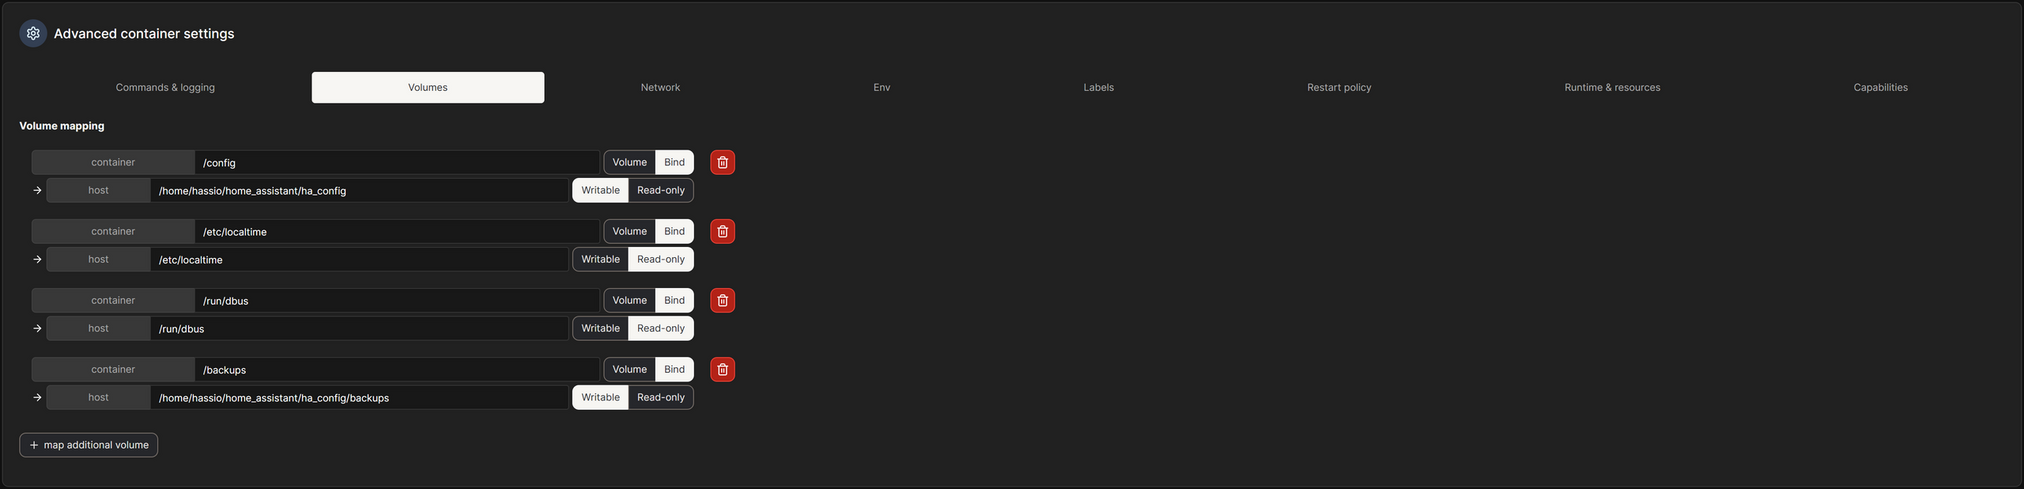
Set your volumes, copying everything from the volumes section from above. Replace the host/config section and optionally set the /backups folder if you want to set a backup location on your host
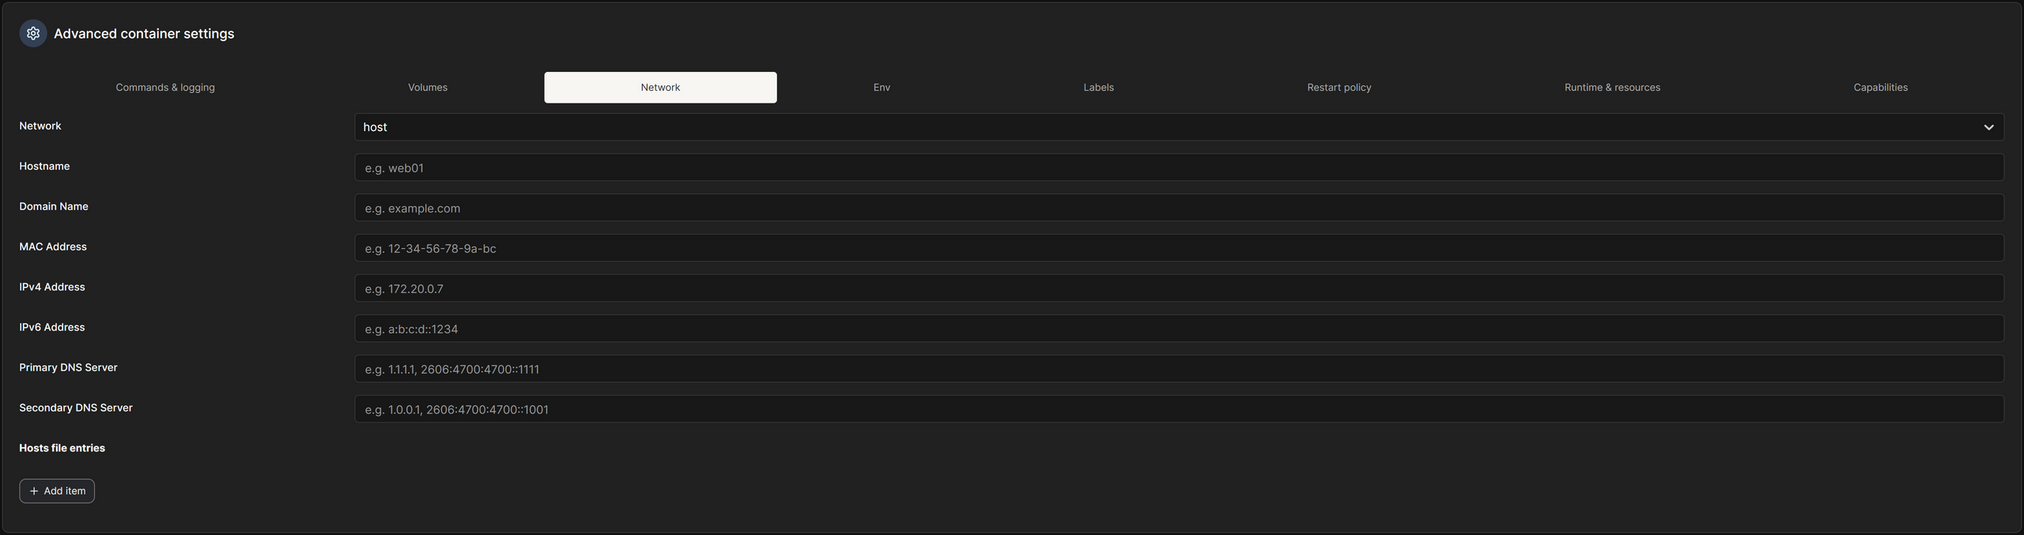
Set your Network to Host
Set your timezone and, optionally, the PUID and GUID to the user’s home folder that you’re putting the files in, so you don’t run into any folder/file permission issues
Set your Restart Policy
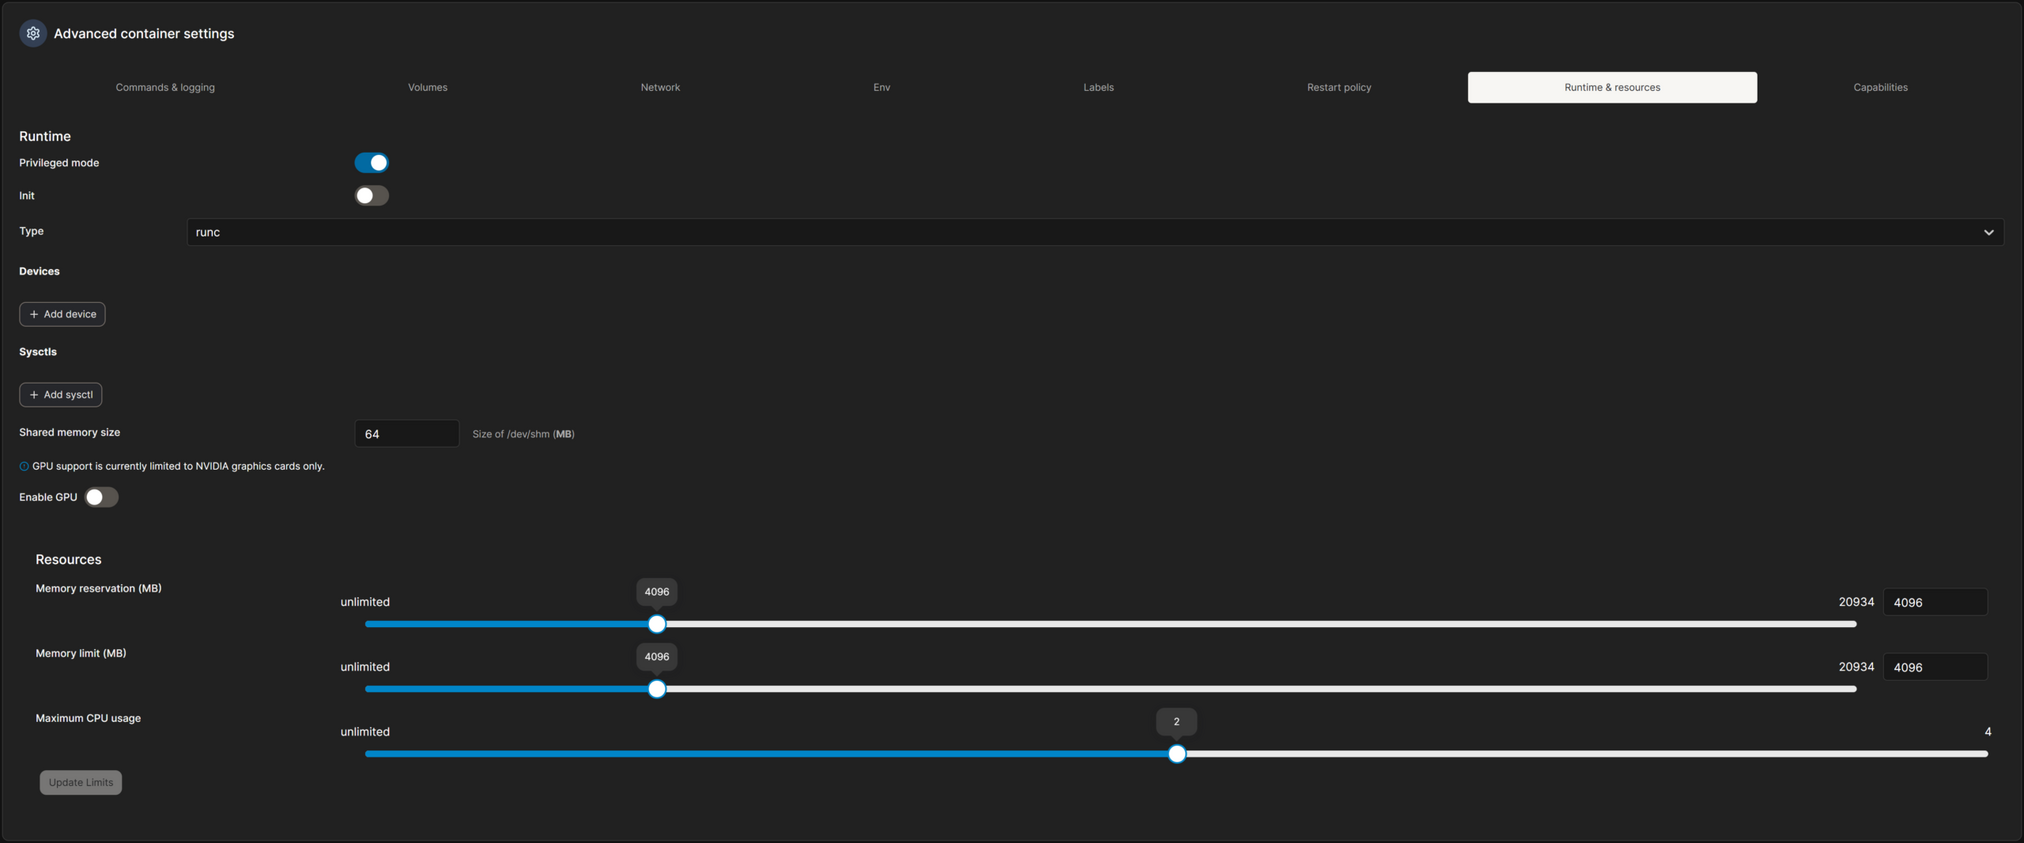
Here we set the Privileged Mode, and any Devices that you need to mount. Optionally, but recommended, set the Resources to a max of what I have set here. I have 5.840 Entities, 4,297 Sensors, 160 Integrations, and 103 Automations. I have no issues running Home Assistant with these restrictions.
Now we can click Deploy to download the image and start the container!
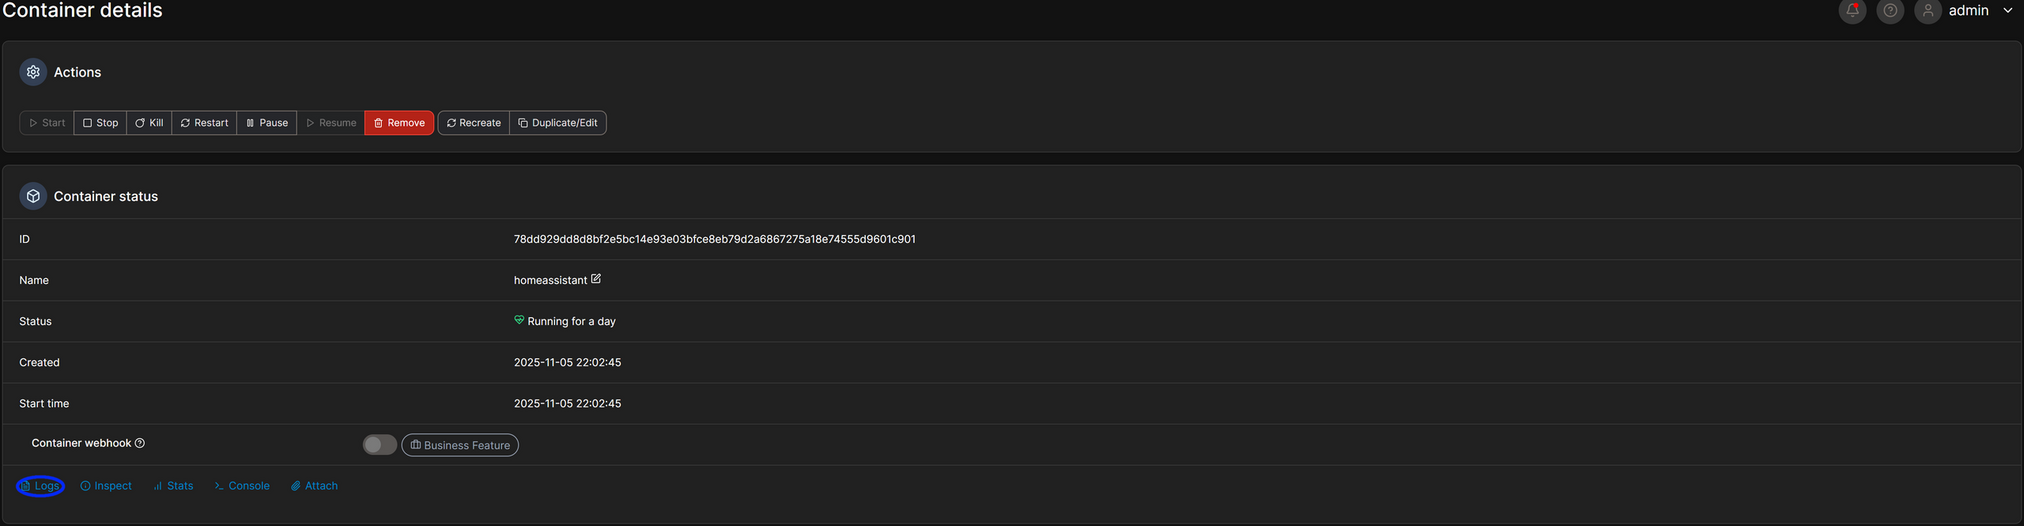
Check the logs of the container with the logs button:
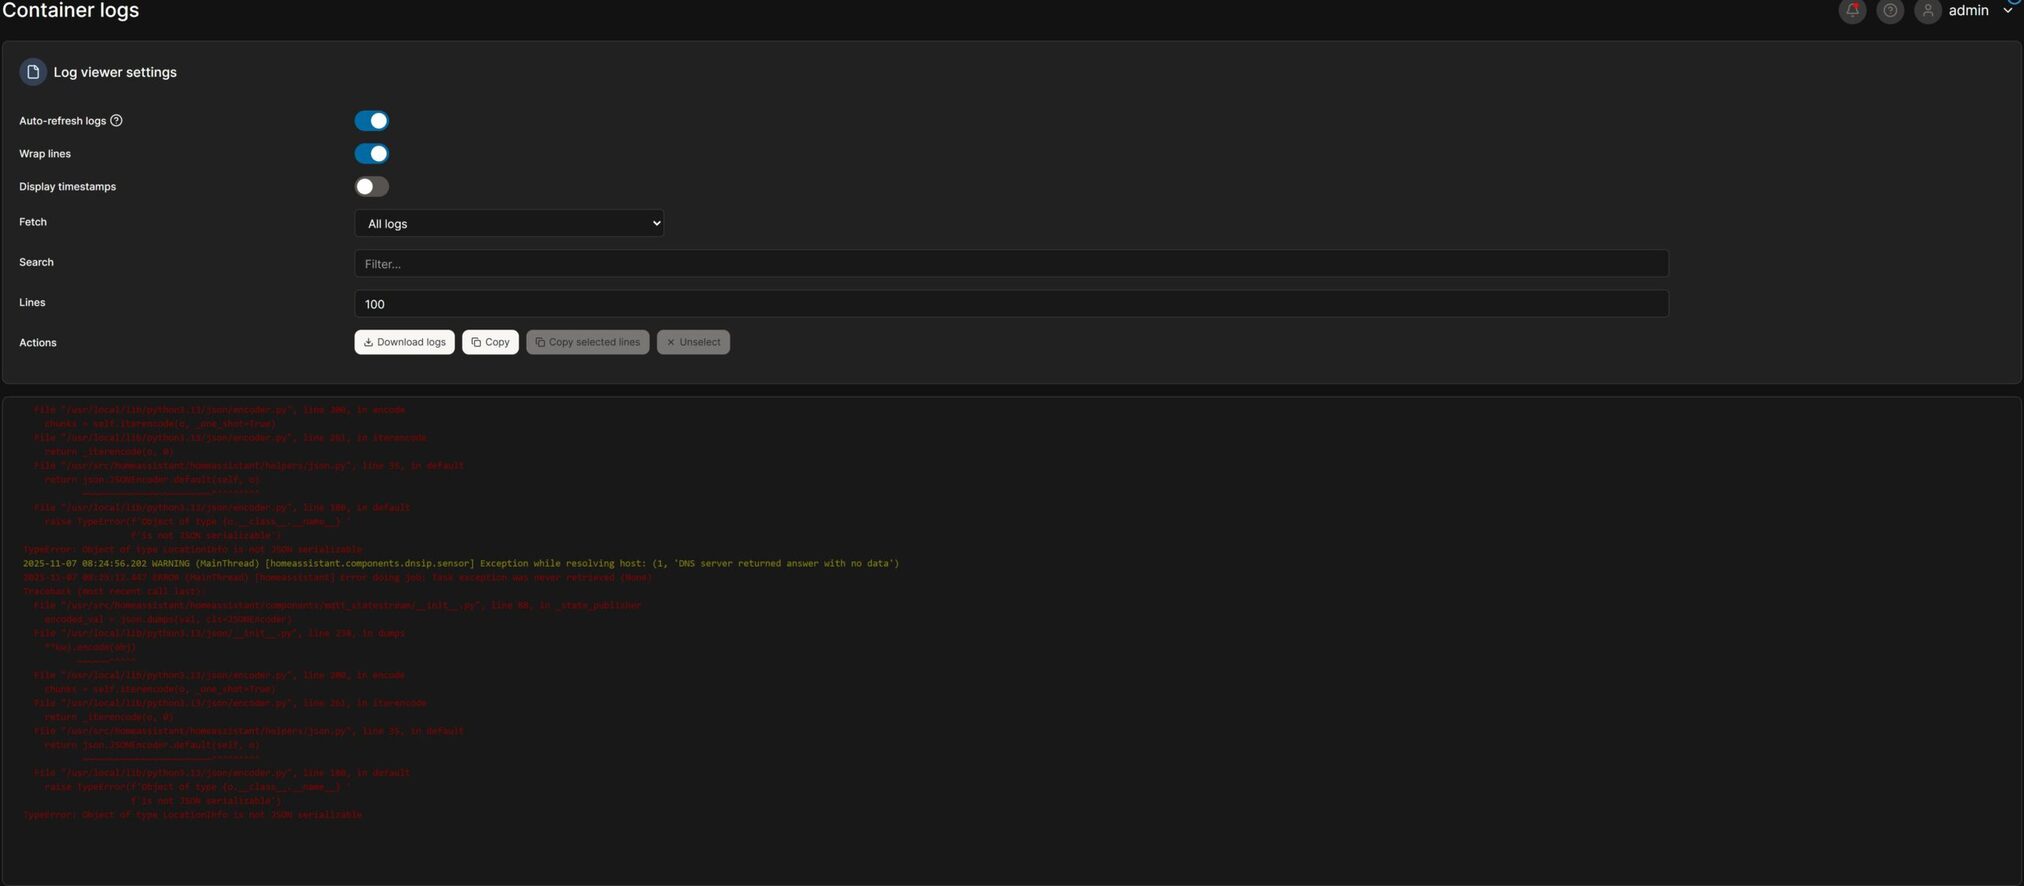
You will now see the current logs of Home Assistant, and it will tell you if anything is wrong. You can set the log’s lines higher if you need to and make sure to turn off auto refresh if you need to read anything, as it refreshes every few seconds, so you can see the latest entries. Don’t mind the red as one of my sensors in complaining.
You should now be all set to use Home Assistant!
Starting the Container with Docker Compose
Now we should be ready to start up Home Assistant for the first time!
All you need to do to start the container is type:
# run with sudo if your user isn't a part of the docker group# change the .yaml file to the one that you createddockercomposecompose.yamlup-d
Bash
We can check the logs of Home Assistant with:
# run with sudo if your user isn't a part of the docker group# replace homeassistant with the name of the service that you set in the compose file from beforedockercompose-fhomeassistant
Bash
Assuming everything went well, you should be ready to configure Home Assistant itself!
Here is a quick cheat sheet for Docker Compose!
# remember to add sudo if your user isn't a part of the docker group!# bring up all services in foreground (attach)dockercomposeup# bring up in background (detached)dockercomposeup-d# rebuild images then updockercomposeup-d--build# stop services (but keep containers)dockercomposestop# start stopped services (existing containers)dockercomposestart# restart servicesdockercomposerestart# show running compose containers for the projectdockercomposeps# show logs (follow)dockercomposelogs-f# logs for a single service:dockercomposelogs-fweb# execute a shell in a running containerdockercomposeexecweb/bin/bash# or if you need tty:dockercomposeexec-Tweb/bin/bash# run a one-off command (creates a temporary container using service definition)dockercomposerun--rmwebbash# bring everything down (stop + remove containers, networks)dockercomposedown# remove stopped containers, networks, images not used by any servicedockercomposedown--rmiall--volumes--remove-orphans# build images onlydockercomposebuild# pull images onlydockercomposepull
Bash
Have fun with the greatest home automation platform in the world(in my opinion)!
If you need any support, feel free to leave a comment or message me on one of my socials! Just make sure to keep it relevant as I get a lot of scam messages and I don’t have a lot of time to waste on spam lol.
🤖 AI Summary: Here’s a quick tutorial on installing Docker and Docker Compose V2 on Debian! This requires that your account has sudo access. First, we have to make sure that we have possible conflicting packages removed. Debian may ship older/unofficial packages that conflict with Docker’s official packages. After that finishes, we can start installing Docker. Enter these […]
Here’s a quick tutorial on installing Docker and Docker Compose V2 on Debian! This requires that your account has sudo access.
First, we have to make sure that we have possible conflicting packages removed. Debian may ship older/unofficial packages that conflict with Docker’s official packages.
After that finishes, we can start installing Docker. Enter these line by line, minus the added comment(#) lines.
sudoaptupdatesudoaptinstall-yca-certificatescurlgnupglsb-release# Create keyring dir (if not exists) and add Docker GPG keysudomkdir-p/etc/apt/keyringscurl-fsSLhttps://download.docker.com/linux/debian/gpg|sudogpg--dearmor-o/etc/apt/keyrings/docker.gpgsudochmoda+r/etc/apt/keyrings/docker.gpg# Add the Docker apt repo (uses your Debian codename)echo"deb [arch=$(dpkg--print-architecture) signed-by=/etc/apt/keyrings/docker.gpg] https://download.docker.com/linux/debian $(lsb_release-cs) stable"|sudotee/etc/apt/sources.list.d/docker.list>/dev/null# Apply changes to aptsudoaptupdate
Bash
Next, we will install Docker Engine, the CLI, containerd, Buildx, and the Docker Compose plugin (Compose V2).
🤖 AI Summary: Here’s a quick tutorial on giving a user sudo access on Debian. I’m going to assume SSH access is set up, and you can log in to root, or you have terminal access on the host system. After you’re logged in as root, all we have to do is run a simple command. usermod means […]
Here’s a quick tutorial on giving a user sudo access on Debian.
I’m going to assume SSH access is set up, and you can log in to root, or you have terminal access on the host system.
After you’re logged in as root, all we have to do is run a simple command.
usermod-AGsudousername
Bash
usermod means we want to modify the users on the system.
-AG, A stands for add, and G stands for group.
In this case, we want to add a user to the sudo group.
Then username is the user you want to add to the group.
Replace username with the user that you want to give sudo access to.
If nothing shows up for an error, and it goes back to the enter command line. Something like root@debian-dell:~# then you’re all set!
🤖 AI Summary: Let’s get Portainer installed! You can either run these commands as ‘sudo’ or run ‘sudo -i’ to run these commands as root. All we need is at least SSH access and/or ftp access(to make it easier for file editing), but that is optional if you just want to quickly get this installed. Quick Rundown: All […]
Let’s get Portainer installed!
You can either run these commands as ‘sudo’ or run ‘sudo -i’ to run these commands as root.
All we need is at least SSH access and/or ftp access(to make it easier for file editing), but that is optional if you just want to quickly get this installed.
Quick Rundown: All we need to do is SSH into the device we want to install Portainer on, configure the ‘compose.yaml’ file and run it.
First, SSH into the device with your tool of choice. Ex. Putty, CMD, Terminal, etc.
Which defines the name of the container to Docker ‘portainer’, you will use this to modify the container later.
image: portainer/portainer-ce:latest
YAML
Tells Docker what image to run. ‘portainer/portainer-ce‘ is Portainer’s Community Edition, ‘:latest’ is the tag, it will pull the newest latest tag on startup.
restart: always
YAML
This is the Docker restart policy. If the container stops (or the host reboots), Docker will automatically try to start it.
    ports:
      - "9443:9443"
YAML
Maps host port 9443 to container port 9443. Portainer uses 9443 for the HTTPS web UI by default. After it starts, you’ll access Portainer at https://<host-ip>:9443.
This binds the Docker socket into the container. This is what gives Portainer the ability to control Docker (list containers, start/stop, create volumes, etc.). VERY powerful: any process that can talk to the Docker socket can control the Docker daemon (and therefore the host).
A host directory mounted into the container’s /data — used by Portainer to store its state (users, settings, DB). This ensures data persists after container upgrades.
Make sure to create a folder so Portainer can store its data. In my case, I put it under my users folder ‘/home/hassio/home_assistant/portainer_data’, but you would probably want to do something like ‘/home/’your username’/portainer_data’ instead. If you copied the file, make sure to change ‘/home/hassio/home_assistant/portainer_data’ to what suits your needs.
    environment:
      - TZ=change_me
YAML
This sets the timezone inside the container so logs and scheduled tasks use that timezone. Cosmetic but helpful. Make sure to change the timezone name or delete it.
All you have to do next is change the Timezone, based on the name you find here.
All you need to do next is run that command, replacing ‘compose.yaml’ with your filename, to validate your Compose file.
sudodockercompose-fcompose.yamlup-d
Bash
That brings the container up.
sudodockercomposeps
Bash
You can see the status of your running containers with that.
sudodockerps--filtername=portainer
Bash
Or use this one to specifically see the status of Portainer if you have multiple containers running. Make sure to change ‘portainer’ to the name that was used in the configuration file.
sudodockercomposelogs-fportainer
Bash
With this one, you can see the log file.
Now your Portainer container should be up and running!
Navigate to ‘https://<host-ip>:9443’, replacing the port number if you changed it in the compose file and replacing ‘<host-ip>’ with the device’s actual IP address.
Make sure to create a strong password, as anyone who has it will be able to change your containers and potentially do malicious things.